UNIVERSITY OF WISCONSIN River Falls
Documentation
Edit an Image
Edit an Image
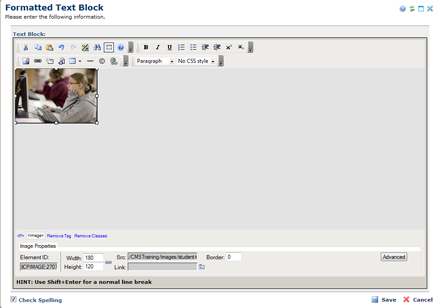
To edit an image in your formatted text block, click the image so that "handles" appear around the image. Do NOT drag the corners to resize the image. Instead, very small adjustments to size can be changed in the Advanced Properties area. Preferably, any size changes should be made in a photo editor such as Photoshop or Windows Paint or by going through CommonSpots Reports.

Once the handles are there, you will see "Image Properties" appear in the area below the text block.
Click "Simple" properties (button on right side) to show Width and Height, the location (subsite/Child site) and a link (if one has been applied). (Once you click "Simple" the button on the "Simple" screen changes to "Advanced" so you can click back.)
You cannot change the grayed box content in the properties window.
You can change the width and height; however, changes made here should be minimal. The image should be resized in a photo editor.
Click "Advanced" properties (shown below but the button says "Simple" so you can go back) to put extra space above/below and on both sides equally; change the alignment; and change the alt tag.

Uploading a New Version of an Image
If you have resized or edited an image in Photoshop and want to replace the old version being used in CommonSpot with the newer version, you can upload a new version.
Image Alignment
To position your image there are several options.
![]() The image alignment here is set to "Default." The line of type is at the bottom of the image and will wrap to the next line underneath the image.
The image alignment here is set to "Default." The line of type is at the bottom of the image and will wrap to the next line underneath the image.
![]() The image alignment here is set to "Left." Typing a lot of text next to the image will wrap from the top of the image all the way down to the bottom and then to the left margin. (The amount of text needs to be greater than the image size in order to see the text wrap below the image, so I added this long sentence to demonstrate that.) You may want to add Horizontal Space to move the text away from the image. Horizontal space will be added to both sides of the image. (see the next image)
The image alignment here is set to "Left." Typing a lot of text next to the image will wrap from the top of the image all the way down to the bottom and then to the left margin. (The amount of text needs to be greater than the image size in order to see the text wrap below the image, so I added this long sentence to demonstrate that.) You may want to add Horizontal Space to move the text away from the image. Horizontal space will be added to both sides of the image. (see the next image)

The image alignment here is set to "Right." The image is placed at the beginning of this sentence, in front of the T in The. Text will wrap as expected.
(You may need to add returns to move the text text in the following paragraphs below the image that is next to this paragraph.)
![]() The image alignment here is set to "Middle." (no horizontal space so it looks crowded when you are editing, but there will be space after you submit it.)
The image alignment here is set to "Middle." (no horizontal space so it looks crowded when you are editing, but there will be space after you submit it.)
![]() The image alignment here is set to "Absolute Middle." (horizontal space = 5 but it only shows in editing; the final view has space added automatically) There is only one line of text that will remain next to the image. The rest of the text wraps below the image.
The image alignment here is set to "Absolute Middle." (horizontal space = 5 but it only shows in editing; the final view has space added automatically) There is only one line of text that will remain next to the image. The rest of the text wraps below the image.
![]() The image alignment here is set to "Text Top." The text appears next to the top of the image, but any text that wraps will wrap to the left margin.
The image alignment here is set to "Text Top." The text appears next to the top of the image, but any text that wraps will wrap to the left margin.
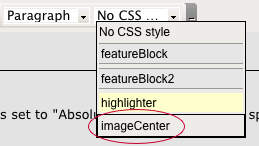
 To center an image, select it then choose ImageCenter from the CSS styles. It won't appear centered until after you save the Text Block.


